前言
2025/04/18更新,注意,telegram图床会受到api的限速,若非telegram会员加载一般较慢
书接上文用cloudflare worker + r2作为twikoo评论图床!不要钱的兼容s3的存储方案
这个存储方案是基于r2的,也就是说会受到r2存储桶免费用例的限制
如何真正意义上做到无限存储的图床呢
想了一下,我之前用的teldrive是无限存储的。是不是可以用telegram当图床然后用cloudflare worker取出呢
于是我找到了这个项目telegraph
逻辑如下
- 这个项目是有一个前端页面的,将图片传到telegram后,将telegram返回的
fileId和这个图片请求的url存入r2数据库
- 在下次访问图片请求时,会先查询缓存是否命中,如果没有命中则根据访问的
url查询数据库是否存在此图片
- 如果存在此图片,则根据查询到的
fileId去访问telegram api获取图片在telegram的uri
- 获取到uri,worker去访问这个uri,将获得到的结果返回给访问者
但这样有以下问题
- 对于已经有图床的人必须从头开始建立图床
- 不兼容
s3 api,对于习惯使用picgo写作的人有一定麻烦
当然,在我发这一篇博文的时候我已经解决了,我的解决方法就是重构worker代码,使其兼容s3 api,并且提供回源请求,在数据库中查询不到图片时就回源到存储桶
实现流程
需求分析一下,我需要实现
s3 api的上传图片- 回源存储桶的功能
实现上传图片首先要明白api的请求结构去对接接口
实现s3 api上传
请注意!本文内容建立在服务端视角,剖析aws s3 api验证的流程,而非客户端发起请求视角。请加以注意。
根据上传文件的api
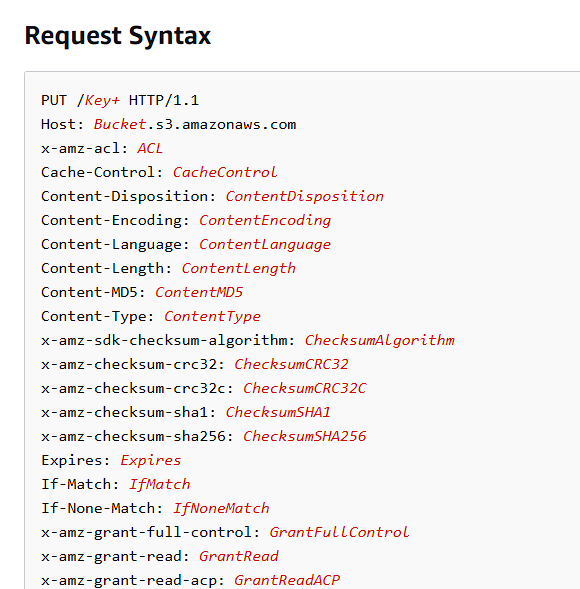
我们只需要简单实现接口,判断接口方法为PUT,然后在上传时验证身份,并把文件存储到相应位置即可(存url到数据库)
最困难的部分在于实现s3的api中鉴权部分。关于s3 api鉴权完整文档请见Authenticating Requests (AWS Signature Version 4)
借用aws官方的图
我将一个个解释这些需要的参数
StringToSign
完整的stringToSign其实是这样的
示例的StringToSign如下所示
1
2
3
4
|
AWS4-HMAC-SHA256
20130524T000000Z
20130524/us-east-1/s3/aws4_request
df57d21db20da04d7fa30298dd4488ba3a2b47ca3a489c74750e0f1e7df1b9b7
|
- 第一行你可以认为是不变的,因为接下来我要实现的就是这种
AWS4-HMAC-SHA256签名算法
- 第二行是UTC时间戳,满足
timeStampISO8601Format,一般验证时使用传入请求头中的x-amz-date
- 第三行是
<Scope>,一个合理的scope由date.Format(<YYYYMMDD>) + "/" + <region> + "/" + <service> + "/aws4_request"组成,对于验证时这里不需要变化,只需要直接使用即可
- 第四行对于加密验证是必要的,也就是服务端验证必须要验证的一行,这一行由上图
CanonicalRequest使用SHA256(CanonicalRequest).hex()得来
基本格式为
1
2
3
4
|
"AWS4-HMAC-SHA256" + "\n" +
timeStampISO8601Format + "\n" +
<Scope> + "\n" +
Hex(SHA256Hash(<CanonicalRequest>))
|
总结一下,这里stringToSign前三行服务端验证时可以由请求头的信息得到,不需要手动计算
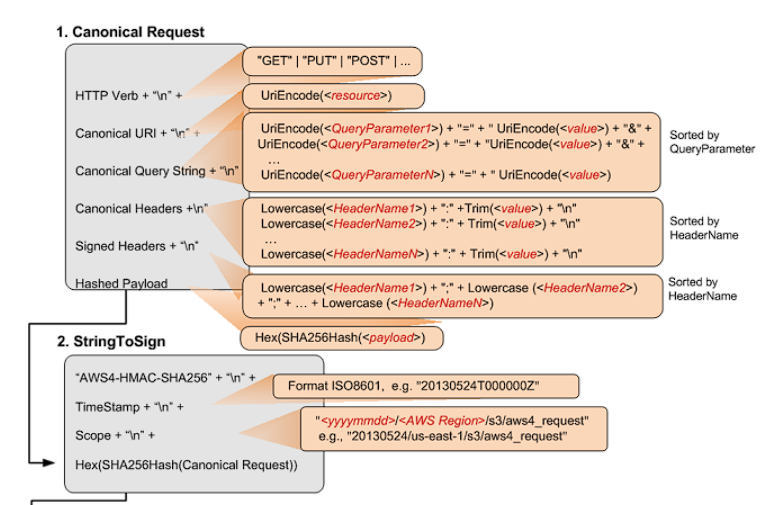
CanonicalRequest

其实看图会更加明显,这里的图把所有的都解析了
以下是一个CanonicalRequest示例,
http请求如下
1
2
3
4
5
6
|
GET /test.txt HTTP/1.1
Host: examplebucket.s3.amazonaws.com
Authorization: SignatureToBeCalculated
Range: bytes=0-9
x-amz-content-sha256:e3b0c44298fc1c149afbf4c8996fb92427ae41e4649b934ca495991b7852b855
x-amz-date: 20130524T000000Z
|
这里由于我是服务端视角,这个authorization将直接给出
1
|
Authorization: AWS4-HMAC-SHA256 Credential=AKIAIOSFODNN7EXAMPLE/20130524/us-east-1/s3/aws4_request,SignedHeaders=date;host;x-amz-content-sha256;x-amz-date;x-amz-storage-class,Signature=98ad721746da40c64f1a55b78f14c238d841ea1380cd77a1b5971af0ece108bd
|
CanonicalRequest如下
 1
 2
 3
 4
 5
 6
 7
 8
 9
10
|
GET
/test.txt

host:examplebucket.s3.amazonaws.com
range:bytes=0-9
x-amz-content-sha256:e3b0c44298fc1c149afbf4c8996fb92427ae41e4649b934ca495991b7852b855
x-amz-date:20130524T000000Z

host;range;x-amz-content-sha256;x-amz-date
e3b0c44298fc1c149afbf4c8996fb92427ae41e4649b934ca495991b7852b855
|
请对照图加以理解
GET即HTTP Verb,然后需要加换行/test.txt 即 Canonical Uri,需要注意的是这里需要使用UniEncode("/test.txt"), 比方说中文的情况- 示例中没有
Canonical Query String,这里直接空一行。需要注意的是这里由于没有Canonical Query String,但还是要空一行
- 接下来是
Canonical header
1
2
3
4
|
host:examplebucket.s3.amazonaws.com
range:bytes=0-9
x-amz-content-sha256:e3b0c44298fc1c149afbf4c8996fb92427ae41e4649b934ca495991b7852b855
x-amz-date:20130524T000000Z
|
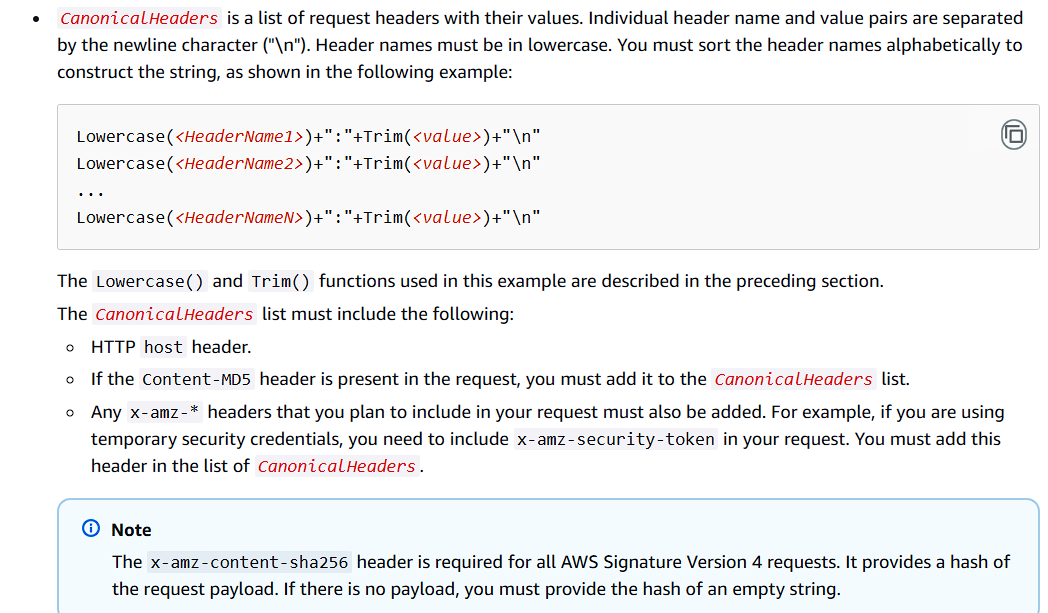
Canonical header并不是所有的http header都要加入其中,对于服务端验证签名来说,需要根据Authorization中的值去判断需要添加什么,而原文档中是以客户端视角去解析的,我这里以最终答案作为已知条件
这里根据上面的Authorization中的值判断得出需要host, range, x-amz-content-sha256, x-amz-date作为**Canonical header**
接着还需要根据header name进行字母序排序,并且需要小写header name,header value需要去除头和尾部的空格,aws文档原来的解释如下
- 最后一行
最后一行为请求body的sha256哈希值,需要和header中
x-amz-content-sha256
作为服务端如果你想偷懒不验证则直接把请求头中的加入最后一行即可,如果想校验就对body校验,将最终结果和header中x-amz-content-sha256作比较,作为一个比较有强迫症的代码人我是选择实现了这个流程
至此CanonicalRequest介绍完毕,StringToSign也可以实现了,接下来解释SigningKey
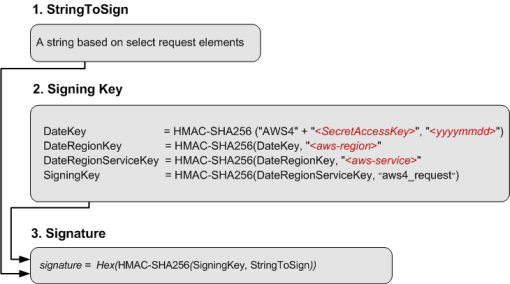
SigningKey

看起来比较简单对吧,但我告诉你,这里挺坑的
我直接上代码吧,以下是python实现
 1
 2
 3
 4
 5
 6
 7
 8
 9
10
11
12
13
14
15
16
17
18
19
20
21
22
23
24
25
26
27
28
29
30
31
32
33
34
35
36
37
38
39
40
41
42
43
44
45
46
47
48
49
50
51
52
53
54
55
56
|
import hmac
import hashlib
import base64
import binascii
def generate_hmac_sha256(secret_key, message):
    # Encode the key and message if they are strings
    if isinstance(secret_key, str):
        secret_key = secret_key.encode()
    if isinstance(message, str):
        message = message.encode()

    hmac_object = hmac.new(secret_key, message, digestmod='sha256')
    return hmac_object.hexdigest()
id = "3xxxxxxxxxxxxxxxx"
key = "xxxxxxxxxxxx"
CanonicalRequest = """PUT
/upload/2024/12/72b7840821a7977ec9c66ddf24cea5b4.jpg
x-id=PutObject
amz-sdk-invocation-id:f17ec2f2-d4ac-4d4b-8b7b-6099142d9926
amz-sdk-request:attempt=1; max=3
content-length:253304
content-type:image/jpeg
host:bucket1.local:8787
x-amz-acl:public-read
x-amz-content-sha256:57f9fe71e01fd670613a4ce75ddbfbb62bee3a4978b51fd78e4e2478dccb635b
x-amz-date:20241215T124726Z
x-amz-user-agent:aws-sdk-js/3.705.0

amz-sdk-invocation-id;amz-sdk-request;content-length;content-type;host;x-amz-acl;x-amz-content-sha256;x-amz-date;x-amz-user-agent
57f9fe71e01fd670613a4ce75ddbfbb62bee3a4978b51fd78e4e2478dccb635b"""

StringToSign = f"""AWS4-HMAC-SHA256
20241215T124726Z
20241215/auto/s3/aws4_request
{hashlib.sha256(CanonicalRequest.encode()).hexdigest()}"""

messageArr = StringToSign.split("\n")[-2].split("/")
date = messageArr[0]
region = messageArr[1]
service = messageArr[2]
sign_message = messageArr[3]
Datekey = generate_hmac_sha256(f"AWS4{key}",date)
print(Datekey)

DateRegionKey = generate_hmac_sha256(binascii.unhexlify(Datekey), region)
print(DateRegionKey)

DateRegionServiceKey = generate_hmac_sha256(binascii.unhexlify(DateRegionKey), service)

print(DateRegionServiceKey)

signing_key = generate_hmac_sha256(binascii.unhexlify(DateRegionServiceKey), sign_message)
print(signing_key)

sig = generate_hmac_sha256(binascii.unhexlify(signing_key), StringToSign)
print(sig)
|
注意看这里,除了第一次加密不需要unhexlify,后面都需要unhexlify
1
2
3
4
5
|
Datekey = generate_hmac_sha256(f"AWS4{key}",date)
DateRegionKey = generate_hmac_sha256(binascii.unhexlify(Datekey), region)
DateRegionServiceKey = generate_hmac_sha256(binascii.unhexlify(DateRegionKey), service)
signing_key = generate_hmac_sha256(binascii.unhexlify(DateRegionServiceKey), sign_message)
sig = generate_hmac_sha256(binascii.unhexlify(signing_key), StringToSign)
|
并且文档中并没有给出hmac_sha256函数的定义,比如第一个Datekey. 图内想表达的逻辑实际上是AWS4{key}作为key, 而后面作为签名message,是HmacSha256(key, message)的形式
在有些库中的实现其实是完全相反的,比如crypto-js中就是HmacSHA256( timeStamp, AWS4${env.S3_SECRET_ACCESS_KEY});.这是HmacSha256(message, key)
就是这两坑给我坑了4个小时
明白坑点以后签名其实也就成功实现了
实现回源存储桶和上传逻辑
这里其实可以写成存储桶实际地址的,例如七牛云的存储桶回源策略一样
但是我实际的实现是以s3 sdk为基础实现的
理一下当前worker的逻辑
请求图片->查找缓存->查数据库->返回
原来的逻辑如果到查数据库都没有找到图片那就返回了
我想实现的是存储桶回源,逻辑要改成这样
请求图片->查找缓存->查数据库->查存储桶->上传到telegram(异步)
-> 返回(异步)
顺便说一下为什么要异步
因为上传到telegram这个过程还是挺长的,用户在访问的时候希望的是在找到数据时需要直接获得数据,而不是等待你的业务流程以后再获得数据(这里一些流程是和用户无关的,用户关心的是这次访问是否能够获得数据)。先显示用户关心的数据,这样即能提升用户体验
在实现中的关键难点在于文件数据处理,对于nodejs和javascript一窍不通的我对此可是真正苦手
对于传入的数据,都是以ReadableStream这个对象封装的,对于一个上传的http请求的文件处理数据需要这样写
 1
 2
 3
 4
 5
 6
 7
 8
 9
10
11
12
13
|
  const data   = await request.body;
  const reader = data.getReader();
  const pic_data = [];
  while (true) {
      const { done, value } = await reader.read();
      if (done) {
          break;
      }
      pic_data.push(value);
  }
  const newFile = new File(pic_data, "some_pic.jpg", { type: request.header['Content-Type'] })
  // process your file. ex. like
  const resp = await SendToTelegram(newFile);
|
ReadableStream cloudflare worker runtime api
从这里可以找到相关的方法,其实是和js是比较相似的
然后是异步的代码。我想要的逻辑是在获取到图片数据时提前返回,但后台接着处理上传逻辑。
由于cloudflare worker的正常生命周期会在return后结束,这里需要一些特别的api调用
这里我是在stackoverflow找到的相关答案
但这个答案我不是很满意,因为它需要使用到event,而我的worker入口触发并不是event
接着阅读cloudflare worker官方文档找到了比较适合的逻辑
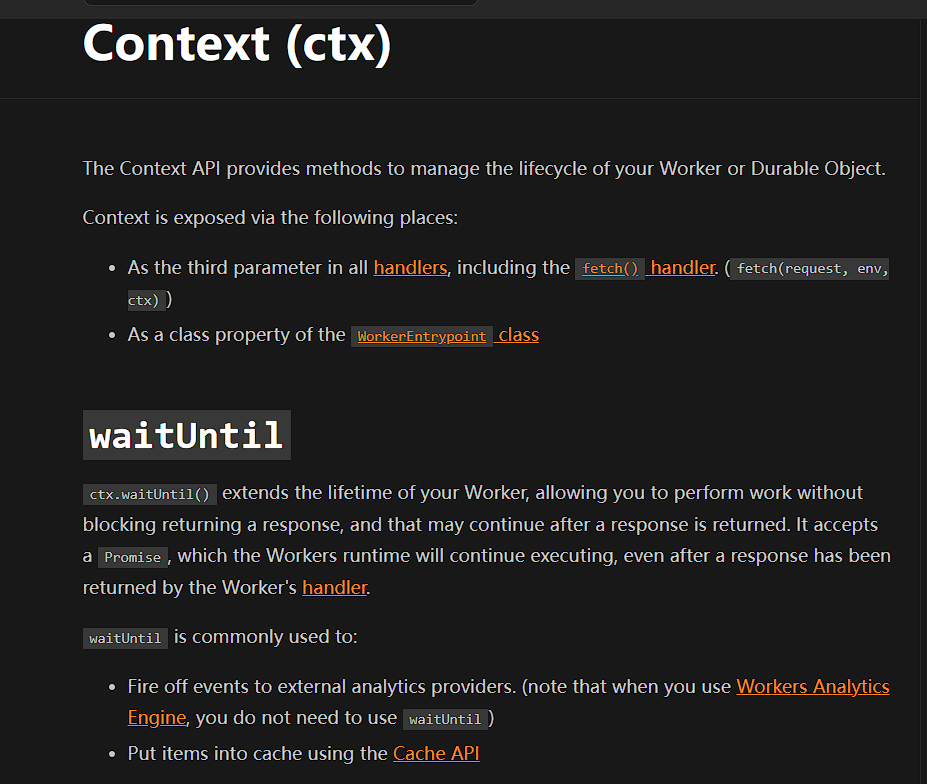
可以看到作用描述如下
ctx.waitUntil() extends the lifetime of your Worker, allowing you to perform work without blocking returning a response, and that may continue after a response is returned.
以下是官方的示例
 1
 2
 3
 4
 5
 6
 7
 8
 9
10
11
12
13
14
15
16
17
|
export default {
  async fetch(request, env, ctx) {
    // Forward / proxy original request
    let res = await fetch(request);

    // Add custom header(s)
    res = new Response(res.body, res);
    res.headers.set('x-foo', 'bar');

    // Cache the response
    // NOTE: Does NOT block / wait
    ctx.waitUntil(caches.default.put(request, res.clone()));

    // Done
    return res;
  },
};
|
这就很适合我的异步逻辑回源异步上传文件到telegram
异步回源代码部分如下
  1
  2
  3
  4
  5
  6
  7
  8
  9
 10
 11
 12
 13
 14
 15
 16
 17
 18
 19
 20
 21
 22
 23
 24
 25
 26
 27
 28
 29
 30
 31
 32
 33
 34
 35
 36
 37
 38
 39
 40
 41
 42
 43
 44
 45
 46
 47
 48
 49
 50
 51
 52
 53
 54
 55
 56
 57
 58
 59
 60
 61
 62
 63
 64
 65
 66
 67
 68
 69
 70
 71
 72
 73
 74
 75
 76
 77
 78
 79
 80
 81
 82
 83
 84
 85
 86
 87
 88
 89
 90
 91
 92
 93
 94
 95
 96
 97
 98
 99
100
101
102
103
104
105
106
107
108
109
110
111
112
113
114
115
116
117
118
119
|
export default {
	async fetch(request, env, ctx) {
		const { pathname } = new URL(request.url);
		switch (request.method) {
			case 'GET':
				return await getImageHandler(request, env, ctx);
            /// ............
		}
	}
}

async function getImageHandler(request, env, ctx){
		const cache = caches.default;
		const { pathname } = new URL(request.url);
		let patharr = pathname.split("/");
		const prefix = pathname.split("/").slice(0, pathname.split("/").length - 1).join("/");
		patharr.shift();
		const cacheKey = new Request(request.url);
		const cachedResponse = await cache.match(cacheKey);
		if (cachedResponse) return cachedResponse;
		const key = pathname.substring(1, pathname.length);
		// Specify the object key
		const objectKey = key;
		if (!objectKey) return new Response("不允许的键", { status: 404 })
		const result = await env.DB.prepare('SELECT url, fileId FROM media WHERE url = ?').bind(request.url).first();
		if (!result) {
			 if (!env.enableOriginS3){
						const notFoundResponse = new Response('资源不存在', { status: 404 });
						await cache.put(cacheKey, notFoundResponse.clone());
						return notFoundResponse;
			 }

			 return findInS3(request.url, env, objectKey, ctx); // 如果开启回源则回源到s3
		}

		return getImage(request.url, env, result.fileId); // 否则直接从tg获得图片

}

async function findInS3(requestUrl, env, objectKey, ctx){
			const img_prefix = env.IMG_PREFIX;
			const s3_endpoint = env.S3_ENDPOINT;
			const s3_bucket_name = env.S3_BUCKET_NAME;
			const s3_region = env.S3_REGION;
			const ACCESS_KEY_ID = env.S3_ACCESS_KEY_ID;
			const SECRET_ACCESS_KEY = env.S3_SECRET_ACCESS_KEY;
			const cache = caches.default;
			const cacheKey = new Request(requestUrl);
			let S3;
			try{
				S3 = new S3Client({
					region: 'auto',
					endpoint: `${s3_endpoint}`,
					credentials: {
						accessKeyId: ACCESS_KEY_ID,
						secretAccessKey: SECRET_ACCESS_KEY,
					},
				});
			} catch (err){
				 return new Response("S3 CONFIG ERROR.", {status: 500});
			}
			const params = {
				Bucket: s3_bucket_name,
				Key: decodeURI(objectKey).trim()
			};

			try{
				let response;
				let retryCount = 0;

				while (true){
						response = await S3.send(new GetObjectCommand(params));
						if (response.$metadata.httpStatusCode === 200) break;
						if (retryCount === 3 && response.$metadata.httpStatusCode !== 200) {
							const resp = new Response("从s3获取文件错误,请稍后再试");
							await cache.put(cacheKey, resp);
							return resp;
						}
						retryCount += 1;
				}

				const data = response.Body;
				if (response.ContentLength / 1024 / 1024 >= 20){
					// 存储桶中大于20MB不能上传tg,直接返回
					const headers = {
						"Content-Type": "binary/octet-stream"
					}
					return new Response(data, {status: response.status, headers});
				}

				const headers = {
					"Content-Type": response.ContentType
				}
				const reader = data.getReader();
				const pic_data = [];
				while (true) {
					const { done, value } = await reader.read();
					if (done) {
						break;
					}
					pic_data.push(value);
				}
				const file = new File(pic_data, objectKey, {type: response.ContentType});
                // 这里就是异步逻辑,不会在这里卡住
				ctx.waitUntil(UploadImage(env, file).then((res) => {
						const fileId = res["fileId"];
						env.DB.prepare('INSERT INTO media (url, fileId) VALUES (?, ?) ON CONFLICT(url) DO NOTHING').bind(requestUrl, fileId).run();
				}))
                // 直接返回从s3获得的文件
				const responseToCache = new Response(file, { status: response.status, headers });
				await cache.put(cacheKey, responseToCache.clone());
				return responseToCache;
			} catch (error){
				console.log(error);
				const ErrorResponse = new Response(error, {status: 404});
				await cache.put(cacheKey, ErrorResponse.clone());
				return ErrorResponse;
			}
}
|
核心上传代码如下
 1
 2
 3
 4
 5
 6
 7
 8
 9
10
11
12
13
14
15
16
17
18
19
20
21
22
23
24
25
26
27
28
29
30
31
32
33
34
35
36
37
38
39
40
41
42
43
44
45
46
47
48
49
50
51
52
53
54
55
56
57
58
59
60
61
62
63
64
65
66
67
68
69
70
71
72
73
74
75
76
77
78
79
80
81
82
83
84
85
86
87
88
89
90
|
export default {
	async fetch(request, env, ctx) {
		const { pathname } = new URL(request.url);
		switch (request.method) {
			case 'PUT':
				return await UploadImageHandler(request, env);
		}
	}
}

async function S3Signv4(request, env){
	const timeStampISO8601Format = request.headers.get("x-amz-date");
	const timeStamp = request.headers.get("x-amz-date").substring(0, 8);
	const authorization = request.headers.get("Authorization").split(" ");
	let algorithm = authorization[0];
	let Credential = authorization[1].split("=").pop().slice(0, -1);
	let SignedHeaders = authorization[2].split("=").pop().slice(0, -1);
	let tmpCredential = Credential.split('/');
	let key_id = tmpCredential.shift();
	let auth_msg = tmpCredential;
	let region = auth_msg[1];
	let service = auth_msg[2];
	const apiVersion = auth_msg[3];
	if (key_id !== env.S3_ACCESS_KEY_ID) return new Response("S3密钥认证错误", {status:400});
	const url = new URL(request.url);
	const CanonicalURI = url.pathname;
	const fileName = url.pathname.split('/').pop()
	const HTTPMethod = request.method;
	const CanonicalQueryString = ((url) => {
		const param = url.searchParams;
		let str = "";
		let sortedNameArr = [];
		for(const [key, value] of  param){
			sortedNameArr.push([key, value]);
		}
		sortedNameArr = sortedNameArr.sort((a, b) => a[0] - b[0]);
		let tmp = [];
		for(const i of sortedNameArr){
			tmp.push(encodeURIComponent(i[0]) + "=" + encodeURIComponent(i[1]));
		}
		return tmp.join("&");
	})(url);
	const CanonicalHeaders = ((header, headerKey) =>
	{
			let result = [];
			for(const [key, value] of header)
				if (headerKey.has(key))
    			result.push([key, value]);
			result = result.sort((a, b) => a[0] - b[0]);
			let tmp = [];
			for(let i of result){
				tmp.push(`${i[0].toLowerCase()}:${i[1].trim()}`);
			}
			return tmp.join("\n");
	})(request.headers, new Set(SignedHeaders.split(";")));
	const reader1 = request.body.getReader();
	const pic_data1 = [];
	const hash = createHash('sha256');
	while (true) {
		const { done, value } = await reader1.read();
		if (done) {
			break;
		}
		pic_data1.push(value);
		hash.update(value);
	}
	const FileBlob = new File(pic_data1, fileName, {type: request.headers.get("content-type")});
	const receivePayLoad = hash.digest('hex');
	const HashedPayload = request.headers.get("x-amz-content-sha256");
	if (HashedPayload !== receivePayLoad) return new Response("S3密钥认证错误", {status:400});
	const canonicalRequest = `${HTTPMethod}\n` +`${CanonicalURI}\n` +`${CanonicalQueryString}\n` +`${CanonicalHeaders}\n\n` +`${SignedHeaders}\n` +`${HashedPayload}`
	const stringToSign = algorithm + "\n" + timeStampISO8601Format + "\n" + `${timeStamp}/auto/s3/aws4_request` + "\n" + SHA256(canonicalRequest).toString(enc.Hex);
	const DateKey = HmacSHA256( timeStamp, `AWS4${env.S3_SECRET_ACCESS_KEY}`,);
	const DateRegionKey = HmacSHA256(region, DateKey);
	const DateRegionServiceKey = HmacSHA256( service, DateRegionKey);
	const SigningKey = HmacSHA256( apiVersion, DateRegionServiceKey);
	const Signature = HmacSHA256( stringToSign, SigningKey).toString(enc.Hex);
	const AuthorizationHeader = `Authorization: ${algorithm} ` + `Credential=${Credential}, ` + `SignedHeaders=${SignedHeaders}, ` + `Signature=${Signature}`;
	if (authorization[3].split("=").pop() !== Signature)
		return new Response("S3密钥认证错误", {status:400})
	const res = await UploadImage(env, FileBlob);
	const fileId = res["fileId"];
	await env.DB.prepare('INSERT INTO media (url, fileId) VALUES (?, ?) ON CONFLICT(url) DO NOTHING').bind( url.origin + url.pathname, fileId).run();
	const responseToCache = new Response("ok", { status: 200, headers: {"content-type": request.headers.get("content-type")} });
	return responseToCache;
}
async function UploadImageHandler(request, env){
	const cache = caches.default;
	return await S3Signv4(request, env);
}
|
完整代码请见github仓库
总结
本文介绍了aws api认证逻辑,并根据此逻辑自制s3上传接口,加入上传到telegram的逻辑,实现了一个兼容s3 api,回源存储桶的cloudflare worker无限容量图床