Preface
Continue from the previous article Use cloudflare worker + r2 as a Twikoo comment image hosting! Free s3-compatible storage solution
This storage solution is based on r2, which means it will be limited by the free use case of r2 storage bucket
How to achieve unlimited storage image hosting in the true sense?
Thinking about it, the teldrive I used before has unlimited storage. Can I use telegram as an image storage and then use cloudflare worker to retrieve it?
So I found this project telegraph
The logic is as follows
- This project has a front-end page. After uploading the image to telegram, the
fileId returned by telegram and the url of the image request are stored in the r2 database
- The next time the image request is accessed, the cache will be queried first to see if it is a hit. If it is not a hit, the database will be queried based on the
url visited to see if the image exists
- If the image exists, the
telegram api is accessed based on the queried fileId to obtain the uri of the image in telegram
- After obtaining the uri, the worker accesses the uri and returns the obtained result to the visitor
But this has the following problems
- For those who already have an image storage, they must build an image storage from scratch
- Incompatible with
s3 api, which is a bit troublesome for people who are used to writing with picgo
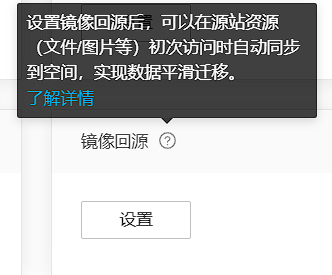
Of course, I had already solved it when I posted this blog post. My solution is to refactor the worker code to make it compatible with s3 api and provide a back-to-source request. When the image cannot be found in the database, it will be back-to-source to the bucket
Implementation process
Analyze the requirements. I need to implement
s3 api to upload images- Back-to-source bucket function
To upload images, you must first understand the api request structure to connect to the interface
Implement s3 api upload
**Please note! The content of this article is based on the server perspective, analyzing the process of aws s3 api verification, not the client-initiated request perspective. Please pay attention. **
According to the API for uploading files
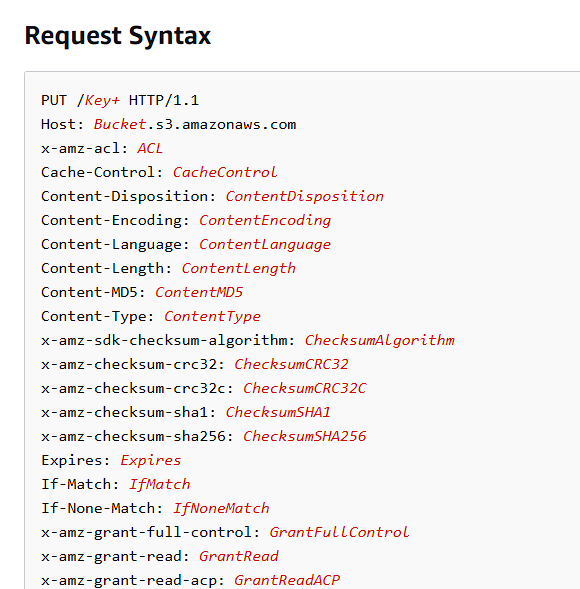
We only need to simply implement the interface, determine that the interface method is PUT, then verify the identity when uploading, and store the file in the corresponding location (save the URL to the database)
The most difficult part is to implement the authentication part in the S3 API. For the complete documentation on s3 api authentication, please see Authenticating Requests (AWS Signature Version 4)
Borrowing the official diagram of aws
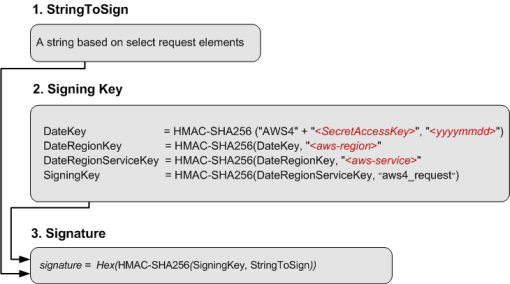
I will explain these required parameters one by one
StringToSign
The complete stringToSign is actually like this
The example StringToSign is as follows
1
2
3
4
|
AWS4-HMAC-SHA256
20130524T000000Z
20130524/us-east-1/s3/aws4_request
df57d21db20da04d7fa30298dd4488ba3a2b47ca3a489c74750e0f1e7df1b9b7
|
- You can think of the first line as unchanged, because what I am going to implement next is this
AWS4-HMAC-SHA256 signature algorithm
- The second line is the UTC timestamp, which satisfies
timeStampISO8601Format. Generally, x-amz-date in the incoming request header is used for verification
- The third line is
<Scope>. A reasonable scope consists of date.Format(<YYYYMMDD>) + "/" + <region> + "/" + <service> + "/aws4_request". There is no need to change here for verification, just use it directly
- The fourth line is necessary for encryption verification, that is, the line that the server must verify. This line is obtained by using
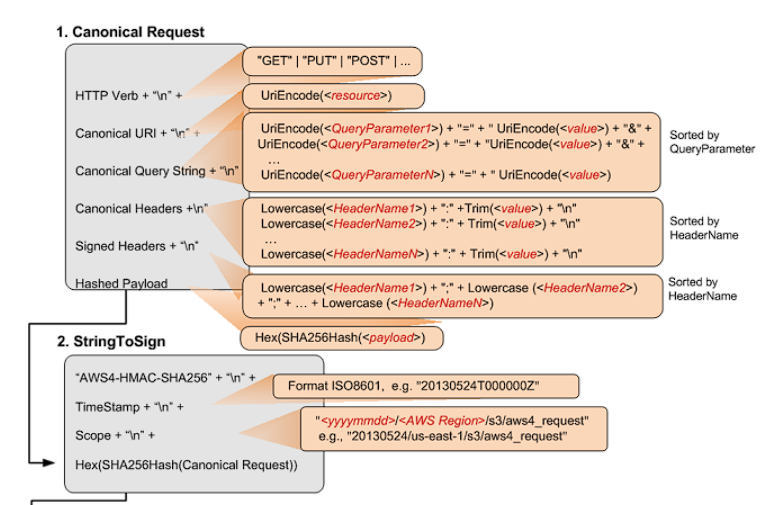
SHA256(CanonicalRequest).hex() in the above figure CanonicalRequest
The basic format is
1
2
3
4
|
"AWS4-HMAC-SHA256" + "\n" +
timeStampISO8601Format + "\n" +
<Scope> + "\n" +
Hex(SHA256Hash(<CanonicalRequest>))
|
To summarize, the first three lines of stringToSign here can be obtained from the request header information when the server verifies, no manual calculation
CanonicalRequest

In fact, it will be more obvious to look at the picture, the picture here analyzes everything
The following is an example of CanonicalRequest,
http request is as follows
1
2
3
4
5
6
|
GET /test.txt HTTP/1.1
Host: examplebucket.s3.amazonaws.com
Authorization: SignatureToBeCalculated
Range: bytes=0-9
x-amz-content-sha256:e3b0c44298fc1c149afbf4c8996fb92427ae41e4649b934ca495991b7852b855
x-amz-date: 20130524T000000Z
|
Here, since I am from the server perspective, this authorization will be given directly
1
|
Authorization: AWS4-HMAC-SHA256 Credential=AKIAIOSFODNN7EXAMPLE/20130524/us-east-1/s3/aws4_request,SignedHeaders=date;host;x-amz-content-sha256;x-amz-date;x-amz-storage-class,Signature=98ad721746da40c64f1a55b78f14c238d841ea1380cd77a1b5971af0ece108bd
|
CanonicalRequest is as follows
 1
 2
 3
 4
 5
 6
 7
 8
 9
10
|
GET
/test.txt

host:examplebucket.s3.amazonaws.com
range:bytes=0-9
x-amz-content-sha256:e3b0c44298fc1c149afbf4c8996fb92427ae41e4649b934ca495991b7852b855
x-amz-date:20130524T000000Z

host;range;x-amz-content-sha256;x-amz-date
e3b0c44298fc1c149afbf4c8996fb92427ae41e4649b934ca495991b7852b855
|
Please refer to the picture for understanding
GET is HTTP Verb, and then a line break is required/test.txt is Canonical Uri, it should be noted that UniEncode("/test.txt") is required here, for example, in the case of Chinese- There is no
Canonical Query String in the example, so just leave a blank line here. It should be noted that since there is no Canonical Query String here, a blank line is still required
- Next is
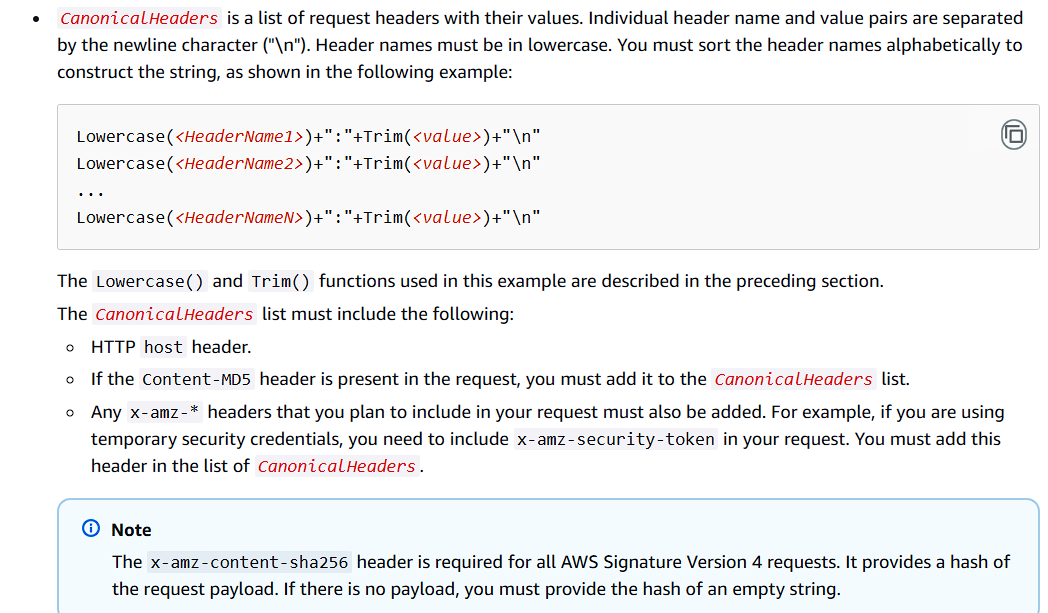
Canonical header
1
2
3
4
|
host:examplebucket.s3.amazonaws.com
range:bytes=0-9
x-amz-content-sha256:e3b0c44298fc1c149afbf4c8996fb92427ae41e4649b934ca495991b7852b855
x-amz-date:20130524T000000Z
|
Canonical header does not include all http header. For server-side signature verification, it is necessary to determine what needs to be added based on the value in Authorization. The original document is parsed from the client’s perspective. I use the final answer as a known condition
Here, according to the value in Authorization above, it is determined that host, range, x-amz-content-sha256, x-amz-date are required as Canonical header
Then it is necessary to sort in alphabetical order according to header name, and the header name needs to be lowercase. The header value needs to remove the leading and trailing spaces. The original explanation of the AWS document is as follows
- The last line
The last line is the sha256 hash value of the request body, which needs to be compared with
x-amz-content-sha256 in the header
As a server, if you want to be lazy and not verify, just add the request header to the last line. If you want to verify, verify the body and compare the final result with x-amz-content-sha256 in the header. As a coder with obsessive-compulsive disorder, I chose to implement this process
So far, the introduction of CanonicalRequest has been completed, and StringToSign can also be implemented. Next, explain SigningKey
SigningKey

It looks simple, right? But I tell you, it’s a bit tricky
Let me go straight to the code. The following is the python implementation
 1
 2
 3
 4
 5
 6
 7
 8
 9
10
11
12
13
14
15
16
17
18
19
20
21
22
23
24
25
26
27
28
29
30
31
32
33
34
35
36
37
38
39
40
41
42
43
44
45
46
47
48
49
50
51
52
53
54
55
56
|
import hmac
import hashlib
import base64
import binascii
def generate_hmac_sha256(secret_key, message):
    # Encode the key and message if they are strings
    if isinstance(secret_key, str):
        secret_key = secret_key.encode()
    if isinstance(message, str):
        message = message.encode()

    hmac_object = hmac.new(secret_key, message, digestmod='sha256')
    return hmac_object.hexdigest()
id = "3xxxxxxxxxxxxxxxx"
key = "xxxxxxxxxxxx"
CanonicalRequest = """PUT
/upload/2024/12/72b7840821a7977ec9c66ddf24cea5b4.jpg
x-id=PutObject
amz-sdk-invocation-id:f17ec2f2-d4ac-4d4b-8b7b-6099142d9926
amz-sdk-request:attempt=1; max=3
content-length:253304
content-type:image/jpeg
host:bucket1.local:8787
x-amz-acl:public-read
x-amz-content-sha256:57f9fe71e01fd670613a4ce75ddbfbb62bee3a4978b51fd78e4e2478dccb635b
x-amz-date:20241215T124726Z
x-amz-user-agent:aws-sdk-js/3.705.0

amz-sdk-invocation-id;amz-sdk-request;content-length;content-type;host;x-amz-acl;x-amz-content-sha256;x-amz-date;x-amz-user-agent
57f9fe71e01fd670613a4ce75ddbfbb62bee3a4978b51fd78e4e2478dccb635b"""

StringToSign = f"""AWS4-HMAC-SHA256
20241215T124726Z
20241215/auto/s3/aws4_request
{hashlib.sha256(CanonicalRequest.encode()).hexdigest()}"""

messageArr = StringToSign.split("\n")[-2].split("/")
date = messageArr[0]
region = messageArr[1]
service = messageArr[2]
sign_message = messageArr[3]
Datekey = generate_hmac_sha256(f"AWS4{key}",date)
print(Datekey)

DateRegionKey = generate_hmac_sha256(binascii.unhexlify(Datekey), region)
print(DateRegionKey)

DateRegionServiceKey = generate_hmac_sha256(binascii.unhexlify(DateRegionKey), service)

print(DateRegionServiceKey)

signing_key = generate_hmac_sha256(binascii.unhexlify(DateRegionServiceKey), sign_message)
print(signing_key)

sig = generate_hmac_sha256(binascii.unhexlify(signing_key), StringToSign)
print(sig)
|
Pay attention here, except for the first encryption, no unhexlify is required for the rest
1
2
3
4
5
|
Datekey = generate_hmac_sha256(f"AWS4{key}",date)
DateRegionKey = generate_hmac_sha256(binascii.unhexlify(Datekey), region)
DateRegionServiceKey = generate_hmac_sha256(binascii.unhexlify(DateRegionKey), service)
signing_key = generate_hmac_sha256(binascii.unhexlify(DateRegionServiceKey), sign_message)
sig = generate_hmac_sha256(binascii.unhexlify(signing_key), StringToSign)
|
And the definition of the hmac_sha256 function is not given in the document, such as the first Datekey. The logic that the figure wants to express is actually AWS4{key} as the key, and the latter as the signature message, in the form of HmacSha256(key, message)
The implementation in some libraries is actually completely opposite, such as HmacSHA256( timeStamp, AWS4${env.S3_SECRET_ACCESS_KEY});. This is HmacSha256(message, key)
These two pitfalls took me 4 hours
After understanding the pitfalls, the signature was actually successfully implemented
Implement the back-to-source storage bucket and upload logic
This can actually be written as the actual address of the storage bucket, such as the storage bucket back-to-source policy of Qiniu Cloud
But my actual implementation is based on s3 sdk
Let’s sort out the current logic of worker
Request image->find cache->check database->return
The original logic returns if the image is not found in the database
What I want to achieve is bucket back-to-source, the logic should be changed to this
Request image->find cache->check database->check bucket->upload to telegram (asynchronous)
-> return (asynchronous)
By the way, why do we need to be asynchronous
Because the process of uploading to telegram is still quite long, when users visit, they want to get the data directly when they find the data, rather than waiting for your business process to get the data later (some processes here are irrelevant to users, and users care about whether they can get the data this time). Display the data that users care about first, which can improve the user experience
The key difficulty in the implementationlies in file data processing, which is really difficult for me who knows nothing about nodejs and javascript
For the incoming data, it is encapsulated in the ReadableStream object. For an uploaded http request file processing data, you need to write it like this
 1
 2
 3
 4
 5
 6
 7
 8
 9
10
11
12
13
|
  const data   = await request.body;
  const reader = data.getReader();
  const pic_data = [];
  while (true) {
      const { done, value } = await reader.read();
      if (done) {
          break;
      }
      pic_data.push(value);
  }
  const newFile = new File(pic_data, "some_pic.jpg", { type: request.header['Content-Type'] })
  // process your file. ex. like
  const resp = await SendToTelegram(newFile);
|
ReadableStream cloudflare worker runtime api
You can find the relevant methods here, which are actually similar to js
Then there is the asynchronous code. The logic I want is to return in advance when the image data is obtained, but the background continues to process the upload logic.
Since the normal life cycle of cloudflare worker ends after return, some special API calls are required here
Here I found the relevant answer on stackoverflow
But I am not very satisfied with this answer because it requires the use of event, and my worker entry trigger is not event
Continue reading cloudflare worker official document found a more suitable logic
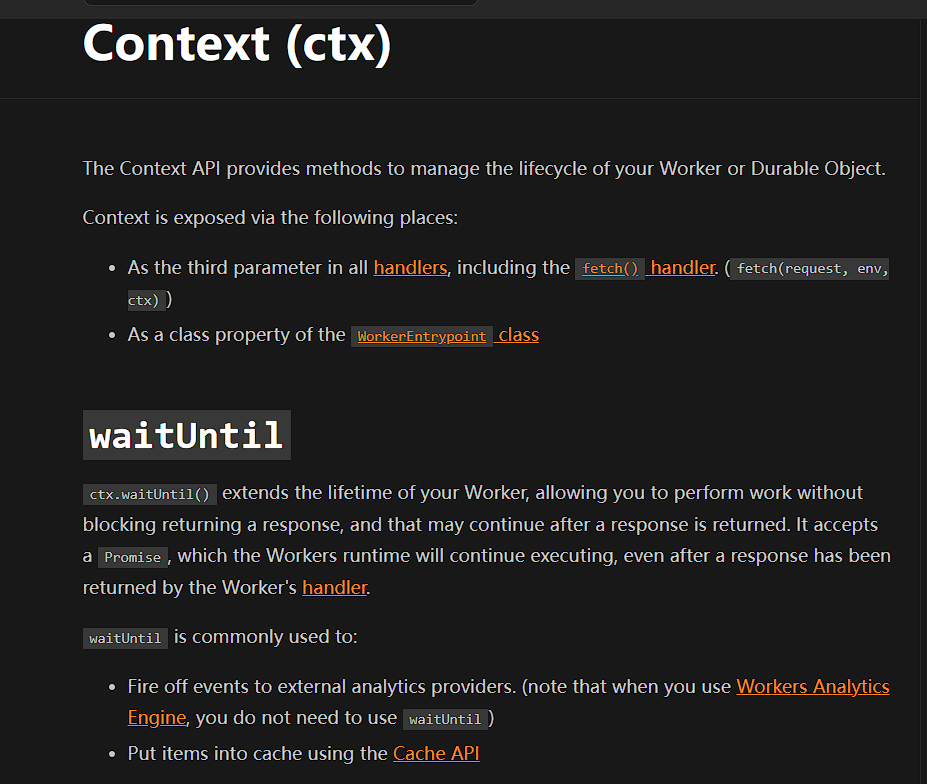
You can see the function description as follows
ctx.waitUntil() extends the lifetime of your Worker, allowing you to perform work without blocking returning a response, and that may continue after a response is returned.
The following is the official example
 1
 2
 3
 4
 5
 6
 7
 8
 9
10
11
12
13
14
15
16
17
|
export default {
  async fetch(request, env, ctx) {
    // Forward / proxy original request
    let res = await fetch(request);

    // Add custom header(s)
    res = new Response(res.body, res);
    res.headers.set('x-foo', 'bar');

    // Cache the response
    // NOTE: Does NOT block / wait
    ctx.waitUntil(caches.default.put(request, res.clone()));

    // Done
    return res;
  },
};
|
This is very suitable for my asynchronous logic to return to the source and asynchronously upload files to telegram
The asynchronous return source code part is as follows
  1
  2
  3
  4
  5
  6
  7
  8
  9
 10
 11
 12
 13
 14
 15
 16
 17
 18
 19
 20
 21
 22
 23
 24
 25
 26
 27
 28
 29
 30
 31
 32
 33
 34
 35
 36
 37
 38
 39
 40
 41
 42
 43
 44
 45
 46
 47
 48
 49
 50
 51
 52
 53
 54
 55
 56
 57
 58
 59
 60
 61
 62
 63
 64
 65
 66
 67
 68
 69
 70
 71
 72
 73
 74
 75
 76
 77
 78
 79
 80
 81
 82
 83
 84
 85
 86
 87
 88
 89
 90
 91
 92
 93
 94
 95
 96
 97
 98
 99
100
101
102
103
104
105
106
107
108
109
110
111
112
113
114
115
116
117
118
119
|
export default {
	async fetch(request, env, ctx) {
		const { pathname } = new URL(request.url);
		switch (request.method) {
			case 'GET':
				return await getImageHandler(request, env, ctx);
            /// ............
		}
	}
}

async function getImageHandler(request, env, ctx){
		const cache = caches.default;
		const { pathname } = new URL(request.url);
		let patharr = pathname.split("/");
		const prefix = pathname.split("/").slice(0, pathname.split("/").length - 1).join("/");
		patharr.shift();
		const cacheKey = new Request(request.url);
		const cachedResponse = await cache.match(cacheKey);
		if (cachedResponse) return cachedResponse;
		const key = pathname.substring(1, pathname.length);
		// Specify the object key
		const objectKey = key;
		if (!objectKey) return new Response("不允许的键", { status: 404 })
		const result = await env.DB.prepare('SELECT url, fileId FROM media WHERE url = ?').bind(request.url).first();
		if (!result) {
			 if (!env.enableOriginS3){
						const notFoundResponse = new Response('资源不存在', { status: 404 });
						await cache.put(cacheKey, notFoundResponse.clone());
						return notFoundResponse;
			 }

			 return findInS3(request.url, env, objectKey, ctx); // 如果开启回源则回源到s3
		}

		return getImage(request.url, env, result.fileId); // 否则直接从tg获得图片

}

async function findInS3(requestUrl, env, objectKey, ctx){
			const img_prefix = env.IMG_PREFIX;
			const s3_endpoint = env.S3_ENDPOINT;
			const s3_bucket_name = env.S3_BUCKET_NAME;
			const s3_region = env.S3_REGION;
			const ACCESS_KEY_ID = env.S3_ACCESS_KEY_ID;
			const SECRET_ACCESS_KEY = env.S3_SECRET_ACCESS_KEY;
			const cache = caches.default;
			const cacheKey = new Request(requestUrl);
			let S3;
			try{
				S3 = new S3Client({
					region: 'auto',
					endpoint: `${s3_endpoint}`,
					credentials: {
						accessKeyId: ACCESS_KEY_ID,
						secretAccessKey: SECRET_ACCESS_KEY,
					},
				});
			} catch (err){
				 return new Response("S3 CONFIG ERROR.", {status: 500});
			}
			const params = {
				Bucket: s3_bucket_name,
				Key: decodeURI(objectKey).trim()
			};

			try{
				let response;
				let retryCount = 0;

				while (true){
						response = await S3.send(new GetObjectCommand(params));
						if (response.$metadata.httpStatusCode === 200) break;
						if (retryCount === 3 && response.$metadata.httpStatusCode !== 200) {
							const resp = new Response("从s3获取文件错误,请稍后再试");
							await cache.put(cacheKey, resp);
							return resp;
						}
						retryCount += 1;
				}

				const data = response.Body;
				if (response.ContentLength / 1024 / 1024 >= 20){
					// 存储桶中大于20MB不能上传tg,直接返回
					const headers = {
						"Content-Type": "binary/octet-stream"
					}
					return new Response(data, {status: response.status, headers});
				}

				const headers = {
					"Content-Type": response.ContentType
				}
				const reader = data.getReader();
				const pic_data = [];
				while (true) {
					const { done, value } = await reader.read();
					if (done) {
						break;
					}
					pic_data.push(value);
				}
				const file = new File(pic_data, objectKey, {type: response.ContentType});
                // 这里就是异步逻辑,不会在这里卡住
				ctx.waitUntil(UploadImage(env, file).then((res) => {
						const fileId = res["fileId"];
						env.DB.prepare('INSERT INTO media (url, fileId) VALUES (?, ?) ON CONFLICT(url) DO NOTHING').bind(requestUrl, fileId).run();
				}))
                // 直接返回从s3获得的文件
				const responseToCache = new Response(file, { status: response.status, headers });
				await cache.put(cacheKey, responseToCache.clone());
				return responseToCache;
			} catch (error){
				console.log(error);
				const ErrorResponse = new Response(error, {status: 404});
				await cache.put(cacheKey, ErrorResponse.clone());
				return ErrorResponse;
			}
}
|
The core upload code is as follows
 1
 2
 3
 4
 5
 6
 7
 8
 9
10
11
12
13
14
15
16
17
18
19
20
21
22
23
24
25
26
27
28
29
30
31
32
33
34
35
36
37
38
39
40
41
42
43
44
45
46
47
48
49
50
51
52
53
54
55
56
57
58
59
60
61
62
63
64
65
66
67
68
69
70
71
72
73
74
75
76
77
78
79
80
81
82
83
84
85
86
87
88
89
90
|
export default {
	async fetch(request, env, ctx) {
		const { pathname } = new URL(request.url);
		switch (request.method) {
			case 'PUT':
				return await UploadImageHandler(request, env);
		}
	}
}

async function S3Signv4(request, env){
	const timeStampISO8601Format = request.headers.get("x-amz-date");
	const timeStamp = request.headers.get("x-amz-date").substring(0, 8);
	const authorization = request.headers.get("Authorization").split(" ");
	let algorithm = authorization[0];
	let Credential = authorization[1].split("=").pop().slice(0, -1);
	let SignedHeaders = authorization[2].split("=").pop().slice(0, -1);
	let tmpCredential = Credential.split('/');
	let key_id = tmpCredential.shift();
	let auth_msg = tmpCredential;
	let region = auth_msg[1];
	let service = auth_msg[2];
	const apiVersion = auth_msg[3];
	if (key_id !== env.S3_ACCESS_KEY_ID) return new Response("S3密钥认证错误", {status:400});
	const url = new URL(request.url);
	const CanonicalURI = url.pathname;
	const fileName = url.pathname.split('/').pop()
	const HTTPMethod = request.method;
	const CanonicalQueryString = ((url) => {
		const param = url.searchParams;
		let str = "";
		let sortedNameArr = [];
		for(const [key, value] of  param){
			sortedNameArr.push([key, value]);
		}
		sortedNameArr = sortedNameArr.sort((a, b) => a[0] - b[0]);
		let tmp = [];
		for(const i of sortedNameArr){
			tmp.push(encodeURIComponent(i[0]) + "=" + encodeURIComponent(i[1]));
		}
		return tmp.join("&");
	})(url);
	const CanonicalHeaders = ((header, headerKey) =>
	{
			let result = [];
			for(const [key, value] of header)
				if (headerKey.has(key))
    			result.push([key, value]);
			result = result.sort((a, b) => a[0] - b[0]);
			let tmp = [];
			for(let i of result){
				tmp.push(`${i[0].toLowerCase()}:${i[1].trim()}`);
			}
			return tmp.join("\n");
	})(request.headers, new Set(SignedHeaders.split(";")));
	const reader1 = request.body.getReader();
	const pic_data1 = [];
	const hash = createHash('sha256');
	while (true) {
		const { done, value } = await reader1.read();
		if (done) {
			break;
		}
		pic_data1.push(value);
		hash.update(value);
	}
	const FileBlob = new File(pic_data1, fileName, {type: request.headers.get("content-type")});
	const receivePayLoad = hash.digest('hex');
	const HashedPayload = request.headers.get("x-amz-content-sha256");
	if (HashedPayload !== receivePayLoad) return new Response("S3密钥认证错误", {status:400});
	const canonicalRequest = `${HTTPMethod}\n` +`${CanonicalURI}\n` +`${CanonicalQueryString}\n` +`${CanonicalHeaders}\n\n` +`${SignedHeaders}\n` +`${HashedPayload}`
	const stringToSign = algorithm + "\n" + timeStampISO8601Format + "\n" + `${timeStamp}/auto/s3/aws4_request` + "\n" + SHA256(canonicalRequest).toString(enc.Hex);
	const DateKey = HmacSHA256( timeStamp, `AWS4${env.S3_SECRET_ACCESS_KEY}`,);
	const DateRegionKey = HmacSHA256(region, DateKey);
	const DateRegionServiceKey = HmacSHA256( service, DateRegionKey);
	const SigningKey = HmacSHA256( apiVersion, DateRegionServiceKey);
	const Signature = HmacSHA256( stringToSign, SigningKey).toString(enc.Hex);
	const AuthorizationHeader = `Authorization: ${algorithm} ` + `Credential=${Credential}, ` + `SignedHeaders=${SignedHeaders}, ` + `Signature=${Signature}`;
	if (authorization[3].split("=").pop() !== Signature)
		return new Response("S3密钥认证错误", {status:400})
	const res = await UploadImage(env, FileBlob);
	const fileId = res["fileId"];
	await env.DB.prepare('INSERT INTO media (url, fileId) VALUES (?, ?) ON CONFLICT(url) DO NOTHING').bind( url.origin + url.pathname, fileId).run();
	const responseToCache = new Response("ok", { status: 200, headers: {"content-type": request.headers.get("content-type")} });
	return responseToCache;
}
async function UploadImageHandler(request, env){
	const cache = caches.default;
	return await S3Signv4(request, env);
}
|
For the complete code, please see github repository
Summary
This article introduces the aws api authentication logic, and based on this logic, makes a self-made s3 upload interface, adds the logic of uploading to telegram, and implements a cloudflare worker unlimited capacity image bed compatible with s3 api and back-to-source storage bucket